Note: This page is incomplete. If you find it of interest an want to know more, please email me & tell me to get off my butt & finish the page!
Creating PC boards is something of a dark art - it's a pretty straightforward process but can only be done successfully when you know all the little tricks.
Like just about everything I do, I got into making PCBs as an offshoot of model railroading.
My earliest PCBs (in the '70s, when I was teenager) were remarkable at the time (given my age and the info/tools/supplies available at the time), but are absolute crap by my current standards. The stuff I make today is pretty good (if I do say so myself) - not industrial quality, but plenty good for any hobbyist's needs.
So then, here are my tricks, accumulated over 30 years of making my own PCBs.
I'll run thru the process then give a list of tools, supplies, and suppliers at the end.
Design
Need to finish this...
Photomask
DALPRO's film is "negative resist", which means that the copper will remain on those areas that receive light.
Need to finish this...
Exposing
Putting the design on copper
I buy 4" x 6" pre-sensitized PCBs. Before exposing them I cut the PCB down to rough size (using a shear; more on this in fabrication, below), leaving about 1/4" of PCB around the mask. I leave this extra room because sometimes the PCBs' photosensitive film is poorly adhered around the edges of the board, and it's a real bummer to expose & develop your board only to watch a part of your circuit's etch-mask wash away, leaving the board useless :(.
Need to finish this...
Developing
The photo film on the PCB is developed with sodium carbonate, also known as washing soda.
You can buy sodium carbonate powder and pre-mixed solution from DALPRO, but it's expensive, and why pay to ship the water?
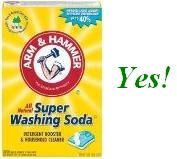
An inexpensive substitute that I use is Arm & Hammer Super Washing Soda, which is exactly the same thing as DALPRO's "dry film developer":

This is different than sodium bicarbonate, which is baking soda:

You do not want to use baking soda!
Need to finish this...
Etching
Etching is a chemical process that "eats" the copper off of the PCB. Basically, you put some Ferric Chloride in a nonreactive (glass, plastic) dish, set the PCB in, and wait 20 minutes.
Here's more than you probably wanted to know:
"Recall your basic chemistry, Doctor."
Ferric Chloride is a weak acid. It etches the board because it's Chlorine component is more strongly attracted to the exposed copper on your PCB than it is to the iron in the solution. Basically you start with a solution of iron and chlorine, mix with copper (the PCB), and you end up with cupric chloride and some iron in the bottom of the pan. You essentially swap the solutions iron for the PCB's copper.
While Ferric Chloride won't burn your skin off, it'll rot many metals, and it's probably not good for you. And it'll permanently stain your clothes. So, always wear gloves, eye protection, and junky clothes. I rarely get any on my clothes/skin, but this is one of those "better safe than sorry" things.
You can also etch with Sodium Persulfate, but that is apparently nastier than Ferric Chloride. I've never used anything but Ferric Chloride, and always had good results, so that's what I use.
Need to finish this...
Stripping
Once again we use washing soda, but in a much higher concentration.
Need to finish this...
Fabrication
Part 1: Drilling the holes
I drill all the holes before cutting the PCB into pieces (when I have >1 circuit on the PCB) because it's easier to handle as a single larger board.
Part 2: Cutting the board to size.
I used to do this on a table saw, which works well except:
- Creates fiberglass dust, which is nasty
- Is dangerous for anything under a couple inches wide
- Hard to cut to greater than .100" accuracy
- Tears the edge of the PCB's fibers a bit
So I broke down and bought a mini Shear/Break, which is EXACTLY what I've needed all along. Cuts are clean, safe, and I can easily cut to under .02" accuracy.
Part 3: Final clean-up for assembly
Need to finish this...
Assembly
Need to finish this...
Other things I've tried but no longer use
- dry xfers
- resist pen
- paint
- photonegative
Tools, Supplies & Suppliers
- Pre-sensitized copper clad board
This the fiberglass board with a layer of copper bonded to it, then the copper is then covered with a layer of light-sensitive photo film.
I buy them mail-order from DALPRO, formerly known as Kepro.
I use DALPRO part# 62DF1/046G6, which is a package of six (6) 1/16" thick boards with copper on one side. You can get all sorts of sizes, but over time I've found that 4x6 is the most manageable and utilitarian size. DALPRO also offers 1/32" thick boards; the thickness you want will depend on your application. I've used both thicknesses, but I typically use 1/16" thick because it's more robust (more resistant to bending, etc).
See DALPRO's Copper Clad page for more options & details.
- Washing Soda, aka sodium carbonate
This can be found in the laundry detergent aisle of most supermarkets, but can also be purchased from Amazon.com
- Ferric Chloride Etchant
I also get this from DALPRO.
Depending upon how much etching you plan to do, you can get it in either 1 quart (DALPRO part# E-1QT) or 1 gallon (DALPRO part# E-1G) bottles.
A little goes a long way - I have a gallon which has lasted me for years.
See DALPRO's Chemicals & Supplies for more options & details.
Note: This costs more to ship because it requires special "hazmat" handling. It's not really dangerous; they just want to prevent the UPS freight monkeys from chucking it around the delivery van like they'd do if you marked it "fragile" or "glass".
- Mini Shear
Here are a few mini shears I found on the Web:
HarborFreight.com - $125
Northern Tool - $170
Micro-Mark - $200
The prices probably reflect the relative quality of the machine. I'm pretty sure I bought mine from Harbor Freight (I recall it costing about $125) and have no regrets - the quality is perfectly good for cutting PCBs in your home workshop.
Questions? Comments? email me!

