Since I resumed working on the Big Cut in October, I've been putting a lot of time into the RR. We've had unusually warm
weather - as of December 1st we've had no snow yet, and daytime temps have been as high as the mid 60's. Feels like a
California winter so far! So I've taken advantage of the weather (i.e. ground not frozen) and have been able to make considerable progress.
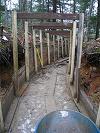
I've installed the retaining walls all the way to the last posts (about halfway thru the cut, which is as far as I'm
currently trying to finish). Some sections of the walls are completed to full height, others have boards on the bottom third -
just enough to hold back the erosion. I'll complete the walls once the ground freezes and I'm no longer able to do grading.
This pic shows how I'm setting the grade. I used my laser-level to make a mark on each post, then made a 0.5% grade (1/4" per 4 feet)
from the beginning of the cut up to the mid-point. This grade is necessary to ensure that the cut drains well - if I were to make the
entire thing flat I'd end up with a big pool of water in the middle.
I then set "grade boards" at the appropriate heights; the pic below is one such board. it's a 2x4 on edge with a 1x4 affixed to the side.
The top of the 1x4 is the grade (dirt level); the 2x4 will be entirely buried. At each end of the 1x4 is a notch for a 2" x 4" gutter.
These gutters will carry the water downhill unimpeded, keeping the dirt in the middle relatively dry. The end result looks kind of like
a bowling lane.
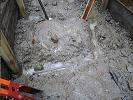
This pic shows a location where I need to add about 6" of fill to bring the grade up.
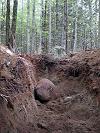
Up at the summit of the cut, the dirt is several inches higher than the final grade. At these posts I need to dig an 8" deep trench
in order to set the grade-board. I then backfill the trench, burying the board, and remove the excess material between boards (dumping it
down-grade where I need the fill). In this picture, the mound of dirt in the center is about 6" higher than the final level.
It's not too bad moving the fill around, but I've learned a lot of lessons for when I do the second half of the cut. Next time
I'll pay closer attention to the rough-grade level when I create it - the excavator is a lot stronger than I am :)
Here's a slideshow of my recent progress:
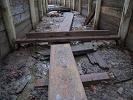
On the right you can see how the retaining walls vary from full height to just the bottom third.
At the bottom of the 1st slide you can see the grade-boards in various stages of buried-ness, as well as the left-hand gutter.
In the distance, near the wheelbarrow, are a few completed sections: both gutters and the dirt filled to grade. The dirt is actually
thick mud at the moment, which makes grading easier but you can't walk on it, so once again I've laid a 2x12 boardwalk until the mud
dries into hardpack.
The boards across the top of the posts are temporary, just to keep the posts plumb. Once I finish grading the floor I'll go trim all
posts to equal heights (above grade) and install final top pieces.
Here's a slideshow showing the evolution of one location:
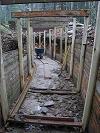
This is the view looking back downgrade. Note the retaining wall at the far-right: just enough to hold back the sides of the cut while
I work on the floor. Also note that both gutters are installed in the sections just before the wheelbarrow.
Here's a closeup of a gutter connected to a grade-board.
Click on the image below to view a movie of water dripping out the end of the gutter (0.5MB WMV)