Extended the Big Cut 50 feet
October 10, 2009
Rented an excavator and extended the Big Cut 50 more feet.
I built this section a bit differently than past sections. Previously, I dug the cut to a rough level, used a post hole digger to set the posts 18" foot deeper than grade, then cut & fit all the pieces (grade board, top span, side walls) to fit. It's a very time-consuming process, made increasingly tedious as the workface gets farther & farther away from the garage (now several hundred feet). Going back-and-forth two or three times for each 4 foot wall section gets old, quick.
This time I pre-made all the pieces, making everything 4 feet, and shipped them out to the workface on the ballast hopper, about 4 trips in all, so that everything would be close at hand when I had the excavator.
To install the posts, I used the excavator to dig deep trenches on each side of the cut, set the posts on the bottom of the trench, installed the grade board and bottom 2 feet the walls, then used the excavator to backfill the whole thing, installing the top span last so as to not block the excavator during backfill. It turns out to be a LOT less manual labor and the results are nicely uniform.
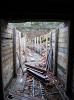
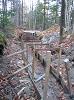
First, an artsy picture.
It's late fall and all the leaves are down. Now that I have some actual track, I've discovered that it will be an annual maintenance item to clear the leaves before it freezes - cleaning up dry leaves in the Fall is a LOT easier than cleaning up wet, half-decomposed leaves in the Spring. Jenny has suggested that I get a leaf blower.
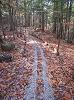
50 more feet of roadbed:
Part of this will be tunnel, the rest open cut. I haven't yet decided where to end the tunnel, and I have yet to install the gutters (though they're all pre-made!).
I laid 2x12s on the ground as a temporary walkway; when initially backfilled, the soil is calf-deep quicksand-like clay. It firms up to a walkable state after a couple weeks once the dense clay forces the water out.
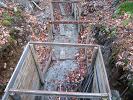
I also decided to make the cut/tunnel a bit narrower going forward. Previously it was a bit over 5 feet wide, which at times was too wide for the 7' long tunnel roof timbers.
I reduced the interior width to 4 feet, and this pic shows the transition (on the left side):
The new section, from on top of the tunnel:
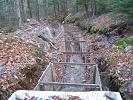
The new section, looking back toward the tunnel:
Those diagonal side braces are to keep the posts vertical until the ground firms up.
I hit the last post (bottom right-hand corner) with the excavator after I had it all installed. Wood is no match for a 7 ton steel machine :).. I'll repair this when I build the next section.