Deck Truss Bridge - October '03
Started construction
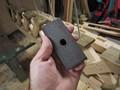
Perhaps the most interesting elements of the structure are the angle blocks that connect the diagonals to the
stringers (the long, lengthwise pieces at the top & bottom). I designed my angle blocks to be just like the
"hacmatac" angle blocks in the vintage plans (hacmatac is an old name for the extremely durable species
of wood known as tamarack or American Larch). The ends of the cross-braces are "pinned" to the blocks
with short dowels that prevent the cross-braces from twisting or moving off the blocks. Here's a closeup
of my angle blocks (made from pressure-treated southern yellow pine) and maple dowels:
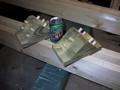
The stringers are notched to create a firm, non-slipping seat for the blocks. Note the spacer between the
stringers; this gives the block a solid base.
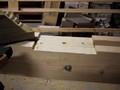
The block fits snugly in the notch, and the 1/2" threaded rod holds it in place.
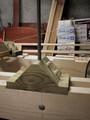
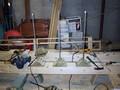
I wasn't exactly sure what the best sequence would be for assembling the truss, so I started in the center
by seating the bottom blocks then adding diagonals and working outward. The result is a continuous lattice
of blocks and diagonals. I hope the top stringer fits!
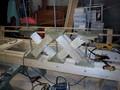
Here's a fully assembled lattice section sans top stringer. Once all the blocks and diagonals have been
placed, I'll add the top stringer and tighten the vertical steel rods to squeeze the whole thing together.
The compression will "pre-load" the structure, making it very stiff.
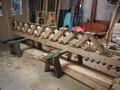
Here's how it looks with the diagonals extended all the way to the end.
This truss (one of 2 for the bridge) is now complete. I'll disassemble it, treat all the parts with wood
preservative, move everything out to the site, then reassemble it in place (it's far too heavy to move as
an assembled unit). Once it's reassembled I'll coat the whole thing with dark stain so it looks like creosote.
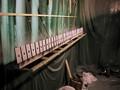
Here's one of the tension plates that I had made at a local blacksmith shop. It's 1/4" thick steel, 2" wide
by 4.5" long, with a 9/16 hole punched in the center. One of these plates will be at each end of each
1/2" dia. threaded rod (38 plates per truss). The plate will distribute the load across the entire width
of the stringer and prevent the nut and washer from pulling thru the wood.
I prepainted the plates to inhibit rust. Here's the white primer coat, next comes the flat black final coat.